expr:class='"loading" + data:blog.mobileClass'>

Saturday, November 28, 2020

Manually install an SSL certificate on my cPanel hosting

 Manually install an SSL certificate on my cPanel hosting.


After your certificate request is approved, you can download your certificate from the SSL manager and install it on your cPanel hosting account. You can watch a short video of this task farther down the page.


Required: Deluxe and extended validation (EV) certificates, as well as SSLs for addon domains or subdomains must be installed manually.


If you haven't done it already, download your certificate from the SSL manager and save the .crt file somewhere that's easy to find.

Go to your Hosting cPanel product page.

Select Web Hosting and then select Manage for the cPanel account you're installing the SSL on.

Select cPanel Admin.

In the Security section, select SSL/TLS.

Under Certificates (CRT), select Generate, view, upload, or delete SSL certificates.

In the Upload a New Certificate section, select Choose File and navigate to the .crt file you downloaded in step 1. Select the file and then select Open.

If you want to, type a description of the certificate in the Description text box.

Select Upload Certificate.

When you get confirmation that the certificate has been saved, select Go Back.

At the bottom of the SSL Certificates page, select Return to SSL Manager.

Under Install and Manage SSL for your site (HTTPS), select Manage SSL Sites.

In the Install an SSL Website section, select Browse Certificates.

Select the certificate that you want to activate and select Use Certificate. This will auto-fill the fields for the certificate.

At the bottom of the page, select Install Certificate.

On the Successfully Installed pop up, select OK.

Your certificate is installed! Now you need to direct visitors to the secure version of your site by redirecting to HTTPS.


Manually install an SSL certificate on my cPanel hosting.

Friday, November 13, 2020

What is the difference between PAL, NTSC, SECAM? What are the World Wide TV Standards? Difference between Pal vs NTSC?


There are a number of TV Standards worldwide. Not all television sets in the world are alike. Countries use one of the three main video standards – PAL, NTSC or SECAM. What this means is that a video from a PAL country will not play in a country that uses the NTSC standard.

Frames

Before we dive deep into the various TV Standards we shall take a look at a few basics of TV transmission. A television transmission consists of a set of rapidly changing pictures to provide an illusion of continuous moving picture to the viewer. The pictures need to come at a rate of 20 pictures per second to create this illusion. Each of these "rapidly changing" pictures is a frame. A typical TV transmission is at 25-30 frames per second (fps).

figure1

Lines

Each frame consists of several closely spaced lines. The lines are scanned from left to right and from top to left. A typical TV picture consists of 525 to 625 lines. Considering this large number of lines, if all were to be written one after another the picture would begin to fade at the top by the time the last line is written. To avoid this, the first frame carries the odd numbered lines and the next frame carries the even numbered lines. This provides uniformity in the picture and this is called interlacing.

figure2

Timing

TV receivers require a source to time the rapid succession of frames on the screen. Designers decided to use the Mains power supply frequency as this source for two good reasons. The first was that with the older type of power supply, you would get rolling hum bars on the TV picture if the mains supply and power source were not at exactly the same frequency. The second was that the TV studio lights or for that matter all fluorescent, non incandescent lights flicker at the mains frequency. Since this flicker is much higher than 16 times per second the eye does not detect it. However this flicker could evolve into an extremely pronounced low frequency flicker on TV screens due to a "beat" frequency generated between the light flicker and the mains frequency. This would have made programmes un-viewable particularly in the early days of development of TV receivers.

The two mains power frequencies worldwide are 50Hz and 60Hz. This meant that there was an immediate division in the TV standards - the one with 25 frames per second (50 Hz) and 30 frames per second (60 Hz). Most of the compatibility problems between TV standards across the world stem from this basic difference in frequencies.

NTSC (National Television Standards Committee)

The majority of 60Hz based countries use a technique known as NTSC originally developed in the United States by a focus committee called the National Television Standards Committee. NTSC (often funnily referred to as Never Twice the Same Colour) works perfectly in a video or closed circuit environment but can exhibit problems of varying colour when used in a broadcast environment.

PAL (Phase Alternate Lines)

This hue change problem is caused by shifts in the colour sub-carrier phase of the signal. A modified version of NTSC soon appeared which differed mainly in that the sub-carrier phase was reversed on each second line; this is known as PAL, standing for Phase Alternate Lines (it has a wide range of funny acronyms including Pictures At Last, Pay for Added Luxury etc). PAL has been adopted by a few 60Hz countries, most notably Brazil.

SECAM

Amongst the countries based on 50Hz systems, PAL has been the most widely adopted. PAL is not the only colour system in widespread use with 50Hz; the French designed a system of their own -primarily for political reasons to protect their domestic manufacturing companies - which is known as SECAM, standing for Sequential Couleur Avec Memoire. The most common facetious acronym is System Essentially Contrary to American Method.

SECAM ON PAL

Some Satellite TV transmissions (usually Russian) that are available over India, are in SECAM Since the field (25 frames /sec) and scan rates are identical, a SECAM signal will replay in B&W on a PAL TV and vice versa. However, transmission frequencies and encoding differences make equipment incompatible from a broadcast viewpoint. For the same reason, system converters between PAL and SECAM, while often difficult to find, are reasonably cheap. In Europe, a few Direct Satellite Broadcasting services use a system called D-MAC. Its use is not wide-spread at present and it is trans-coded to PAL or SECAM to permit video recording of its signals. It includes features for 16:9 (widescreen) aspect ratio transmissions and an eventual migration path to Europe's proposed HDTV standard. There are other MAC-based standards in use around the world including B-MAC in Australia and B-MAC60 on some private networks in the USA. There is also a second European variant called D2-MAC which supports additional audio channels making transmitted signals incompatible, but not baseband signals.

Quick Facts:

  • NTSC and PAL are video standards that are recorded on the cassette. These videos send and electronic signal to the television, then only it can be viewed.
  • In, India, PAL video format is supported.
  • NTSC is the video standard commonly used in North America and most of South America.
  • PAL is the video standard which is popular in most of the European and Asian countries.
  • The difference between NTSC and PAL is the transmission of number of frames per second. In NTSC, 30 frames are transmitted per second. Each frame is constituted up of 525 scan lines.
  • In PAL, 25 frames are transmitted per second. Each frame consists of 625 scan lines.
  • Second, the power frequency used in NTSC is 60 Hz. While in PAL, the power frequency is 50 HZ.

Suggested Readings

[1].From World TV Standards (http://www.scatmag.com/technical/worldtv.pdf)

Friday, October 16, 2020

The Best Top 5 Hard Disk Bad Sector Removal Software's | Data Recovery | Repair Bad Sector in Hard Drive | Recover Data from External Hard Drive

The Best Top 5 Hard Disk Bad Sector Removal Software's | Data Recovery | Repair Bad Sector in Hard Drive | Recover Data from External Hard Drive.


The hard disk role in a computer system can't be argued as it is where you will store the operating system and other files. Though other storage devices like USB flash drives, CD/DVD, etc., can't be used to keep the operating system for one or other reasons. Hard drive bad sectors make the hard drive inaccessible to read and write operations and are very common. The bad sectors' data may be lost temporarily and permanently depending on the cause, i.e., hardware or software. Hardware errors are impossible to fix, and it would be best to back up the hard drive and replace it. Software errors can be corrected with a software application designed for a specific task.

Part 1. The Best 5 Hard Disk Bad Sector Removal Software

Part 2. How to Check and Repair Bad Sector in Hard Drive

Part 3. The 5 Main Reasons May Cause Hard Disk Bad Sector

Part 4. How to Recover Data from External Hard Drive


Part 1. The Best 5 Hard Disk Bad Sector Removal Software

1. HDD Regenerator

It is one of the best software to repair hard drive bad sectors that you can find online. HDD Regenerator can scan the hard drive for bad sectors and correct them if possible. If repair is not possible, you can at least some information stored on it with an HDD Regenerator's help.


Pros:

Allow repair damage that otherwise is not possible.


Ensure data security in bad sectors.


Easy retrieval of information stored on it.


Cons:

The free version can only repair one bad sector.


Expensive to buy the full version.


2. Flobo Hard Disk Repair


Flobo hard disk regenerator is lousy sector removal software that allows users to recover their hard drive. Flobo hard disk bad sector repair software makes the operating system of your computer working again. This utility creates a scan of the hard drive, shows the bad sectors, and predicts the hard drive failure. It monitors the health status of the hard drive and repairs any errors encountered. With the predictions about the hard drive failure, you will be able to save your data from being lost by making a backup at the right time.


Pros:

Repair hard disk errors.


Check the health status of the hard drive.


Accurate predictions about drive failure.


Suggestion for backing up data.


Cons:

Not compatible with the latest version of Windows, like Windows 8.1/10.


3. HDDScan


HDDScan utility is a hard drive diagnostics tool that you can use to repair the hard drive bad sectors. When you work with HDDScan, you will perform a detailed check on the errors on the hard drive due to software problems. You can also perform a health check of the hard drive for degradation and predict possible failure. This will be helpful as it will help make a backup of your hard drive band prevent permanent loss of the data.


Pros:

Supports a large number of storage devices.


Fast disk checkup.


Allow reading and analyzing S.M.A.R.T. parameters.


Compatible with the latest Windows 8.1/10.


Cons:

The simultaneous test may generate different reports.


Not reliable for checking USB drives.


4. Active@ Hard Disk Monitor


As the name suggests, Active@ Hard Disk Monitor is a utility software to check the hard drive's health status. It supports monitoring and displaying hard drive bad sectors. The temperature is also shown in it. The reports can be used to prevent data loss due to hard drive corruption.


Pros:

Remote monitoring.


Monitors temperature and makes a temperature graph.


Send email notifications about the condition of critical drives.


Straightforward to use and simple interface.


Cons:

The same license can’t be used for more computers.


5. Macrorit Disk Scanner


Macrorit Disk Scanner is a disk checkup utility that checks the hard drive for bad sectors and marks the bad sectors. This is one of the fastest tools to scan for the hard drive bad sectors and supports many hard drives. It also supports portable operation, meaning you can check an offline disk by copying the tool to a USB flash drive.


Pros:

It supports many storage devices.


Compatible with all versions of Windows.


Selective scanning options.


Automatic saving of scan results.


Cons:

The free version supports limited features.


The unlimited edition is as expensive as $99.


Part 2. How to Check and Repair Bad Sector in Hard Drive


In Windows, there is a built-in utility that allows checking hard drive bad sectors. It can also repair the bad sectors if they are not caused by physical damage or device failure. The tool's working is similar for all versions of windows like XP, 7, 8, 8.1, and 10. Follow the below steps to check and repair bad driving sectors with the Windows' built-in Error Checking tool.


Step 1: Go to My Computer/Computer/This PC as per the Windows version.

Step 2: Right-click on the hard drive you want to scan for errors and click "Properties".

Step 3: Now, click on the "Tools" tab in the Properties dialog box.

Step 4: Then click on the "Check Now" button below the "Error-Checking" section.


Step 5: Check both options in the dialog box appeared and clicked "Start." This will start the scan and repair task.


Close the programs and files in use on the drive which you want to check. This is because the Error Checking tool needs to dismount the drive before starting the checkup, and opened files can cause conflict with it. You can also schedule a disk checkup. Error Checker will automatically run the disk checkup when you boot the system the next time.


Part 3. The 5 Main Reasons May Cause Hard Disk Bad Sector

1. Virus Attack May Cause Hard Disk Bad Sector

Virus infection is one of the main reasons that can cause hard disk bad sectors. Many viruses can remove or modify system registries and file system table. If they release a link to a file or folder from the system registry, it will become inaccessible. Viruses can cause logical hard drive bad sectors, but they can't damage the hard drive physically. Generally, repairing destructive analytical industries are more comfortable to remove, and for physical damage, you would need to replace the hard drive. Removing the viruses from the system will solve any lousy sector errors on your hard drive.


2. Sudden Shutdown May Cause Hard Disk Bad Sector


The hard drive uses physical parts such as drive heads to read and write the data on it. When the aim is active, it always moves from one location of the hard drive to another. If you don't correctly shutdown the system, the drive head may damage the disk. Once the hard drive is damaged, the damaged part won't be available for reading and write operations and cause bad sectors. Moreover, this type of physical hard drive bad sectors can't be repaired. They should be marked off-limits for write operations as the data may not be written and gets lost. Blue Screen of Death error may also cause a sudden shutdown.


3. File System Error May Cause Hard Disk Bad Sector


The data on a hard drive is stored adhering to a specific design. The file system does the task of allocating space to a file, and an error in the file system can compromise the whole system integrity. Some parts on the hard drive may become inaccessible for reading and write operations. You can use the chad utility on Windows to scan and fix file system errors.


4. Excess Heat May Cause Hard Disk Bad Sector


Heat is the enemy of every computer component, and the same is the case with the hard drive. Hard drives are not meant to be used at high temperatures as the disk can get damaged. Moreover, it can damage other internal components in the hard disk. So, hard drive bad sectors can be caused by overheating, and if you don't want to lose data due to this, use the hard drive at optimum temperatures.


5. Age

Every hard drive suffers from wear and tear with use and has a fixed life. If you haven't replaced your hard disks for a long time, your data may be at risk. Hard Drive accumulates some damage over time, and this can cause hard drive bad sectors. The rate at which this can occur depends on how you use it, but it will give in someday. So it is better to keep a backup of your data so that it can be recovered in case your hard drive fails.


Part 4. How to Recover Data from External Hard Drive

The major problem with hard drive bad sectors is that it can make the data stored inaccessible, making it permanently lost. That is why you need the Recoverit Data Recovery to recover data from corrupted hard drives, USB flash drives, memory cards, and others. This recovery tool has been the best software for recovering lost data due to accident deletion, storage corruption, virus infection, etc.


Easy Steps to Recover Lost Data from External Hard Drive

Step 1: Get Recoverit Hard Drive Recovery Software


Download and install Recoverit on your computer. After installing it, launch the software. 


Step 2: Choose the Hard Drive


Select the drive from which you want to recover files and click "Start". This will start the scanning process. It is also possible to recover data from mobile devices if they support mounting the internal storage.


Step 3. Recover Data from External Hard Drive


Preview the files that are found on the drive for recovery. The results will have all the files like file type, name, and size in Recoverit Data Recovery. Hit the "Recover" button and select the location where to recover the file.

Conclusion: Now, you've learned more about 5 Hard Disk Bad Sector Removal Software. You can choose the right software according to your own needs. Recoverit comes with powerful functions to help you recover data from the external hard drives. You can free download and have a try.


The Best Top 5 Hard Disk Bad Sector Removal Software's | Data Recovery | Repair Bad Sector in Hard Drive | Recover Data from External Hard Drive.


Free tool to check and repair bad sectors for hard drive, external HDD, SD card, flash drive | How to check and repair bad sectors?

Free tool to check and repair bad sectors for hard drive, external HDD, SD card, flash drive | How to check and repair bad sectors?

Overview on bad sectors

What is a hard drive bad sector?


A bad sector is a sector on a hard disk that cannot be used due to permanent damage (or an OS inability to successfully access it), such as physical damage to the disk surface (or sometimes sectors being stuck in a magnetic or digital state that cannot be reversed) or failed flash memory transistors. Something weird will happen if the hard disk has bad sectors, for instance, operating system cannot boot normally; hard disk can't be formatted; when you open a file, error is reported. These phenomena show that there must be bad sectors on the disk. In fact, it is very common that disk used for a long time has bad sectors. There are two types of bad sectors – physical (hard) and logical (soft) bad sector.


Physical / hard bad sectors are a cluster of sectors of the hard drive that are physically damaged. If a hard drive's head touches the rotating plater, that area will be damaged. For example, your computer gets bumped while its hard drive is writing data, hard disk is exposed to extreme heat, or some mechanical part fails, all these are likely to cause hard bad sectors. As to solid-state drive, bad sectors are the result of worn out flash memory cell or other defects. This type of bad sector cannot be repaired, but it can be prevented.


Logical / soft bad sectors are sectors on hard drive that appear to not be working properly. When operating system tries to read or write data stored on these sectors and finds error correction code (ECC) which does not match content of the sector, that indicates that something is wrong and these sectors may be tagged as bad sectors. Soft bad sectors are repairable by overwriting on disk with zeros, which can be done by bad sector repair software such as DiskGenius.


How do I know if my hard drive has bad sectors?


Hard disk might be one of the most fragile hardware among computer components. If not taken proper care, data would be at the risk of loss. Likewise, everything else, hard drive bad sectors give signs and symptoms. If you know the warning signs beforehand, you have a good chance to prevent disaster. Let's look at some signs telling hard disk probably contains bad sectors.


Drive becomes RAW and inaccessible. When you try to access it, you receive error messages such as "Location is not available. Drive: \ is not accessible. Data error (cyclic redundancy check)".

It takes a long time to run a program or read data, or software stops responding frequently. Computers slows down or freezes when the damaged hard drive in connected.

Hard drive makes strange noises when computer boots or you try to access data in this disk.

When you want to perform a quick format to the device, formatting fails with error message "Windows was unable to complete the format".

Windows keeps popping up a messaging telling "Windows detected a hard disk problem" and suggesting backing up data.

Windows slows down and BSOD. Computer takes ages to start up or system booting always ends up with a blue screen of death.

S.M.A.R.T. information. There are tools that can read S.M.A.R.T. data of hard drive. If it shows the hard drive is failing, the disk is likely to have bad sectors.

What can cause bad sectors in a hard drive?


Sectors on hard drive can easily get damaged due to all kinds of reasons. Bad sectors are no longer available for data storage and cause data loss most of times. To prevent bad sectors, you need to know the most common reasons behind it. Here are some factors that can cause bad sectors:


Aging devices: Like other electronic devices, hard drive has an expected life span. If your hard drive has been used for a long time, it is likely to be wearing out and bad sectors might have been created over time.

Turn off computer improperly: Platters in hard drive rotate in a high speed when working, as heads have to read data from different location on the disk. When sudden power failure or improper system shutdown happens, heads in hard drive will be forced to back to situ. During this process, head is likely to touch or rub disk platters, damaging that area and causing bad sectors. In a similar way, if external hard drive is unplugged from computer directly without using safely removing hardware, bad sectors are likely to be caused.

Shaking or knocking: Though many manufacturers have tried their best to enable to enable the shock-resistant function, it does not mean you no longer need to worry about shacking or striking. Dropping hard drive or laptop to floor, excessive collision or knocking, especially when disk is working, can lead to severe physical bad sectors.

Poor quality: Hard drives with low quality tend to have shorter overall lifespan and develop bad sectors. Such kind of hard drive probably contains bad sectors when it is produced.

Dust: Working in a dusty environment is one of the most common causes that are often overlooked by users. As heads are very close to disk platters, if any dust falls into the disk, bad sectors will occur soon.

Check and Repair Bad Sectors

Free software to check and repair bad sectors


Is it possible to check or repair bad sectors on hard drive and USB drives? The answer is YES. There are bad sector check and repair tools online, and you can download one of them to help you perform a surface scanning. Besides, it is still possible to recover files from a damaged hard drive caused by bad sectors. Let's see a free bad sector repair tool – DiskGenius Free Edition.


DiskGenius Free Edition, compatible with all Windows editions, enables you to find out whether hard disk has errors. It is able to check and repair bad sectors for hard drives, SSD and USB storage devices such as external hard drive, SD card, USB flash drive. Meanwhile, it is free partition manager and data recovery freeware, which is trusted and recommended by millions of users.


As we all know, bad sector repairing damages data, thus you should backup or recover data beforehand. DiskGenius provides data backup and data recovery features, thus you can back up important data and save lost data, such as clone damaged disk, create a sector-level image for disk or partition, recover data from RAW drive or unallocated disk, restore lost partitions, etc.


How to check bad sectors for hard drive or USB drive?


Step 1   Start DiskGenius Free Edition on your computer, select the disk that needs checking bad sectors, and click item Verify or Repair Bad Sectors under Disk menu, as below:


check and repair bad sectors


Step 2   Click Start Verify button on the "Bad Track Verification" dialog box, and DiskGenius starts to perform a surface scanning to find bad sectors.


Before you get started, you can set timeout value or scanning cylinder range by entering exact value. If you are not an expert and have no ideas about these settings, you can just follow default value.


check and repair bad sectors

Step 3   While verifying bad sectors, DiskGenius displays detailed information of hard drive sectors. Sectors marked by red blocked means damaged, and these are bad sectors. Severe does not mean bad sector, but it is likely to turn to bad sectors in the future.


check and repair bad sectors

Step 4   When scanning completes, DiskGenius reports how many bad sectors are found. You can click Save Report button to save the scanning result.


check and repair bad sectors

Note: If you want to check bad sectors for system disk which installs Windows operating system, you should use DiskGenius WinPE edition to complete the task in order to get a more accurate test result. To access DiskGenius WinPE Edition, you can either boot to WinPE from Windows directly (click "File" menu > choose "Reboot to DiskGenius WinPE version") or create a bootable USB disk.


How to repair bad sectors using free bad sector repair tool?

Important:

Checking bad sector is read-only process and does not affect disk itself or files on hard drive, however, repairing bad sector is a different story. Before trying any bad sector repairing solution, make sure you have a good backup of your files on the damaged disk, as repair action probably result in the loss of files or corruption of file system.

Repairing bad sector is of no help to data recovery. The bad sector repair destroys data on the disk; more exactly, it destroys data on bad sectors or near bad sectors. Thus, you need to back up data before the bad sector repair. It is common that the disk cannot read data due to bad sectors, and in such a condition, you need to recover data first instead of doing the bad sector repair.

Not all bad sectors are repairable such as physical bad sectors. If DiskGenius cannot repair all bad sectors on your hard drive, you can isolate bad sectors by creating a partition on the disk area that contains bad sectors and hiding the partition with the help of DiskGenius.

Step 1   Click Repair button if you want to repair bad sectors on the "Bad Track Verification" window.


Step 2   You'll receive a warning that asks to back up data first. If you have created a backup for important data, click OK button. If not, click Cancel and backup your files.


check and repair bad sectors

Step 3   Another warning message from DiskGenius, which tells repairing bad sectors does not equal to recovering files and you should recover data first.


Click OK if file recovery is not needed. If you want to recover data, you should click Cancel and use File Recovery function to scan the disk to find lost data.


check and repair bad sectors

Step 4   When the repairing process completes, you will receive following message. Click OK button and close the software.


check and repair bad sectors

Questions and answers about bad sectors

1. Why hard drive gets bad sectors?


One of the reasons is that hard disk has bad sectors when it is manufactured; experienced data recovery engineers know which disk is likely to have bad sectors judging by its brand, manufactured time, working hours, etc. Another reason is the improper operations such as unduly defragment.


2. Do I need to fix bad sector issue as soon as possible?


Yes! It will become a vicious circle if you do not fix bad sectors timely, because that may cause more bad sectors. Therefore, you'd better detect bad sectors regularly and do bad sector repair timely. Meanwhile, though bad sectors are fixed, the disk is riskier of getting bad sectors than normal ones. So, you should be cautious when you use a disk that had bad sectors before and do not save important data on it. The logical bad sector can be fixed, while the physical bad sectors cannot be repaired, but usually they can be remapped. Bad sector repair and detect software can detect bad sectors, repair logical bad sectors, and remap physical bad sectors.


3. Can bad sectors be fixed via low-level formatting (LLF)?


Low-level formatting can be used to fix server bad sectors. However, the low-level formatting is a double-edged sword; it can fix bad sectors as well as do hard to hard disk, especially when the hard disk has physical bad sectors. Thus, the low-level formatting is the last choice of bad sector repair.


4. Is it possible that a new hard drive contains bad sectors?


It is barely known that when a hard disk is manufactured, there are areas on the platter that have bad sectors! These bad sectors, hidden in P-LIST and G-LIST, will not affect normal use and they can't be accessed by common software either. G-LIST can store several hundred bad sectors and the P-LIST can store about four thousand bad sectors. For more information about G-LIST and P-List, please read related articles. One thing to note if your hard drive contains irreparable bad sectors, it is not advised to store importance data on that disk for data security reasons.


Conclusion

It is a common occurrence that your hard drive or other storage devices develop bad sectors, and there is no need to be panic when you run into such issues. You can use DiskGenius Free Edition to easily check or repair bad sectors. In addition, do not forget to create backups for important files and keep backups on different disks in case that one of them fails to work.


Free tool to check and repair bad sectors for hard drive, external HDD, SD card, flash drive | How to check and repair bad sectors?

Saturday, October 10, 2020

AP EAMCET 2020 Result Date: JNTU likely to release results by 10 am today on sche.ap.gov.in, manabadi

AP EAMCET 2020 Result Date: JNTU likely to release results by 10 am today on sche.ap.gov.in, manabadi.


AP EAMCET 2020 Results expected today. JNTU Kakinada, the conducting authority of Andhra Pradesh Engineering Agriculture and Medical Common Entrance Test, AP EAMCET 2020 is expected to release the results online on the official website sche.ap.gov.in. The results would also be available on manabadi.co.in and schools9.com. Check latest updates on EAMCET Results 2020 here. 


AP EAMCET 2020 Result, Rank Card: How to check

  1. Go to the official websites sche.ap.gov.in. 
  2. Once released, EAMCET results would be available on sche.ap.gov.in - click on the dirct link here
  3. On the website home page that opens, click on the Result link
  4. A new window would open - enter your roll number and submit to check your result

Students who have appeared for the examination may please note that the official announcement of result date is awaited. Th Students are advised to keep a check on the official website and this page for latest updates.

Over 1.5 lakh students appear for the AP EAMCET examinations. This year the examination were conducted from September 17 to September 25. Special exam was also conducted for students who could not appear for the examination earlier due to COVID19. The answer sheets for the special examinations have also been released and objection window now closed.

With the post result work complete for both engineering and agriculture courses, it is likely that the result for the two would be announced together. As for the AP EAMCET 2020 Rank Cards, they are likely to be released after the results are declared.

AP EAMCET 2020 Rank

AP EAMCET Ranks are calculated by adding the marks scored in the examination as well as the marks scored by candidates in their intermediate examinations. The weightage for AP EAMCET Score and Board Examination score is 75 and 25 per cent respectively. Candidates who qualify AP EAMCET are required to download the Rank Card from the official website once released. 

#AP_EAMCET_2020_Results, #EamcetResultsToday, #manabadi, #OnlineExamResultsOfficialWebsite, #EamcetRank


AP EAMCET 2020 Result Date: JNTU likely to release results by 10 am today on sche.ap.gov.in, manabadi.


Thursday, April 16, 2020

How to Delete Unused Wordpress Themes Installed on Your Website or Blog ? & Why should It Need ?

How to Delete Installed WordPress Themes

Now that you know the importance of not having too many themes on your blog, let's get to the instructions on how to delete the unused ones.
1. Log into your WordPress Dashboard.
2. Go to Appearances, and you'll find Themes.
3. Clicking on Themes will bring up all the themes you have installed on your blog. Find the theme that you want to uninstall or delete.
4. Hover your mouse over the theme and you'll see Theme Details appear in the center of the installed theme. Click Theme Details.
5. This will display information about the theme. In the bottom corner, in red, you'll find Delete. Click Delete.
6. Confirm if you really want to delete the theme. Once you do so, the theme will be permanently deleted from your WordPress site.
How to Delete Unused Wordpress Themes Installed on Your Website or Blog

Note:- 
1. Keep the theme you are currently using and always have a backup theme.
2. Always keep the newest WordPress theme around to assist with any troubleshooting.
3. Always have a backup of your content when changing themes.

Why should It Need ?

It’s easy to amass unused themes in your WordPress install. Each year WordPress releases a new theme, and you get it automatically when you update WordPress. Additionally, there are the themes you used to use, the themes you tried but abandoned, and so on. So, you may ask, what’s the harm?

There are a couple of reasons why you don’t want to keep unused themes around, cluttering up your WordPress install.

1) Themes are subject to vulnerabilities. If the theme developer is NOT issuing updates, your site is vulnerable. If the theme developer is providing security updates, then you have to keep the theme updated to be safe. Updating unused themes is a waste of keystrokes, so I like to remove them instead.

2) Themes take disk space (which may or may not be an issue) but just by being there, they will slow down your backup routine and INCREASE the size of your backup file. Not good.

So, now you have two good reasons to delete unused themes. But here’s why I never delete ALL my unused themes, and always keep the newest WordPress-developed theme around, even if I’m not using it: troubleshooting.
One way to troubleshooting pesky WordPress problems is to switch themes, and see if the problem goes away. If you don’t have an extra unused theme all ready installed, you now have to install one. Depending on the problem you are having, installing a new theme may be difficult. (FYI, another troubleshooting tip is to deactivate all your plugins. But I digress.)
So, now you know why to delete all but one extra theme. Deleting them is easy. Here’s how.
Go to Appearance / Themes and click on the theme thumbnail. When the Theme Details popover appears, look in the lower-right hand corner for Delete (it’s in red).
IMPORTANT NOTES: If your active theme is a child theme that requires a parent theme, the parent theme will NOT display a Delete button. Also, your active theme will never display a Delete button. Just like plugins, in order to delete a theme, it must be inactive.

What Is The Difference Between Tags And Keywords? | WhatBuddy

Keywords are actually a part of the content and are used to identify what the content is all about. On the other hand, tags are just placed by the creator of the content to describe what the content is and what it relates to. It may appear on the same page as the content, but it is not a part of it.
Keywords are everywhere.,while Tags are seen mostly in blogs or sites that organize their contents as distinct pages or articles.
1. Keywords are actually part of the content but not tags
2. Keywords are seen in all web content while tags are seen mostly in blogs
3. Tags are used for organizing similar content in a site while keywords are not

What Are Keywords?
Keywords are used by search engines to identify what your blog and your blog articles are about. A search engine knows what terms are highly searched by users, and looks for those words and phrases on web pages. The search engine uses this information (in addition to other, more complicated algorithms) to assign a particular blog or website a page rank. This is where “search engine optimization” comes in. If you optimize an article on your blog with a particular keyword, the search engine will be able to pick up it and will hopefully assign your article a decent page rank for that particular keyword.

What Are Tags?
Tags are self-assigned “labels” that you can use to categorise the posts on your blog. For example, if your blog’s niche is puppies, you might have a tag for “puppy diet” and another tag for “puppy exercise.” For all posts about puppy food, treats and snacks, you would assign the “puppy diet” tag. For all posts about puppy exercise and playing, you would assign the “puppy exercise” tag.

Monday, April 6, 2020

How to fix maximum upload and php memory limit issues in WordPress ? #WhatBuddy

This error usually occurs when you are trying to upload a WordPress theme or a plugin to your website from the WordPress admin area.
The link you followed has expired error displayed on a WordPress website
WordPress hosting companies have a setting which controls the size of files you can upload from inside the WordPress admin area. They also have a setting which stops scripts from running too long.
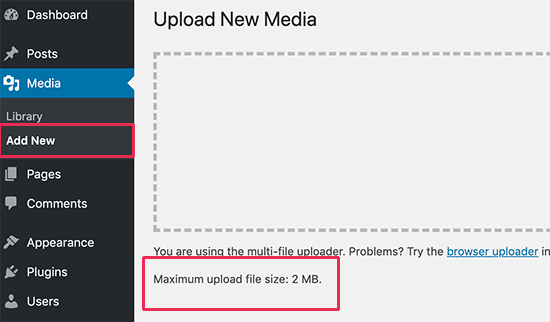
You can see the file size upload limit by visiting Media » Add New page.
WordPress file upload limit
These restrictions make your website safer and improves the overall performance of your WordPress hosting server.
If these settings are too low, or you are trying to upload a larger file, then you would see errors like memory exhausted error or maximum execution time exceeded error.
However, if you are trying to upload a WordPress theme or plugin, then you would see ‘The link you followed has expired’ error.
That being said, let’s take a look at how to easily fix this problem.

Fixing ‘The Link You Have Followed Has Expired’ Error

The quickest way to fix ‘The link you followed has expired’ error is by increasing the file upload size, PHP memory, and execution time limits for your website.
There are multiple ways to do that. We will show you all of them, and you can choose the one that looks easier or the one that works on your hosting environment.
Method 1. Increasing limits in functions.php file
This method is easier, but it has a downside. Your site will return back to the old limits if you change WordPress theme. If you are planning on changing your theme, then try one of the other two methods described below.
Simply add the following code to your WordPress theme’s functions.php file.
1
2
3
@ini_set( 'upload_max_size' , '120M' );
@ini_set( 'post_max_size', '120M');
@ini_set( 'max_execution_time', '300' );
You can increase the values in upload_max_size and post_max_size to be more than the file you are trying to upload.
You will also need to increase the max_execution_time to the time you think it would take for the file to upload. If you are unsure, then you can try doubling this value.
Method 2. Fix by increasing limits in .htaccess file
If you don’t want to add code to your theme’s functions file, then you can try the .htaccess method.
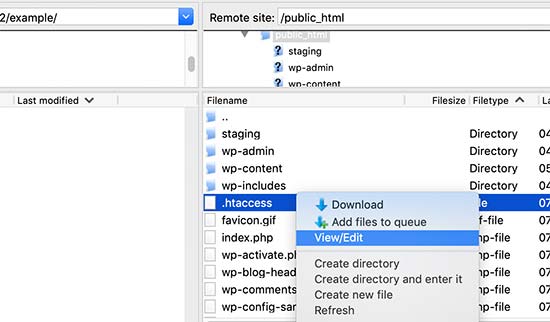
For this method, you will need to edit the .htaccess file by using an FTP client or the File Manager app in cPanel.
Simply connect to your website using FTP and edit the .htaccess file.
Editing the .htaccess file using FTP
Now, you need to add the following code at the bottom of your .htaccess file.
1
2
3
4
php_value upload_max_filesize 128M
php_value post_max_size 128M
php_value max_execution_time 300
php_value max_input_time 300
Don’t forget to save your changes and upload the file back to your website.
Method 3. Fix by increasing limits in php.ini file
The php.ini file is a configuration file used by PHP and WordPress. You’ need to connect to your WordPress site using an FTP client and look for php.ini file in your site’s root folder.
Most users are on a shared hosting account, so they may not find it in their site’s root folder. In that case, you need to create a blank php.ini file using a plain text editor like Notepad and upload it to your website.
Now edit the php.ini file and add the following code inside it.
1
2
3
upload_max_filesize = 128M
post_max_size = 128M
max_execution_time = 300
Don’t forget to save your changes and upload the file back to your website.
You can now visit your website and try to upload the theme or plugin file. The error would disappear, and you should be able to upload the file.
If it doesn’t, then try to increase file limits to match the file size you are trying to upload.